tadaaaaaaaaa.. this is why they say if at first you don't succeed try and try again.. of course I have no way of telling what they taste like so it can be all looks and no substance ____________
indeed indeed.. yesterday I had $12 worth of macaroons i.e 3 of them.. gonna start charging the going rate at laudaree hehehe.. except mine have no artificial ingredients and I don't use alcoholic extracts.. It is only the good stuff so I'll up the price for quality...
are my all time fav. but sometimes when in the mood I like butterscotch.
folks don't think you can get ice cream wrong and any flavor will do but I disagree
bryers just has vanilla, sugar and cream so the flavors are really robust.. Hagen has a nice complexity of creaminess and nuttiness because well sometimes I feel like a nut
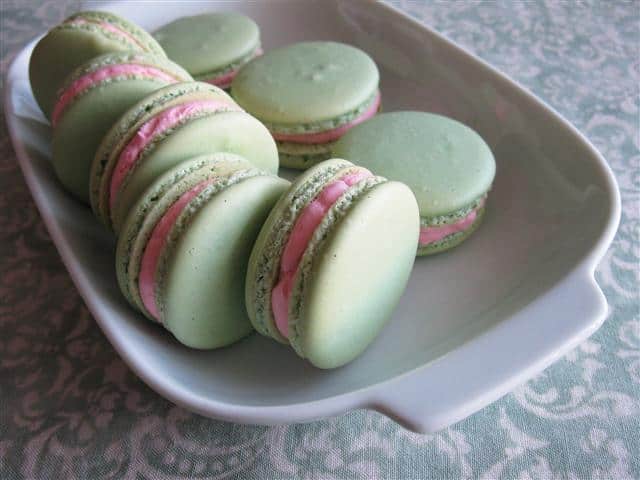
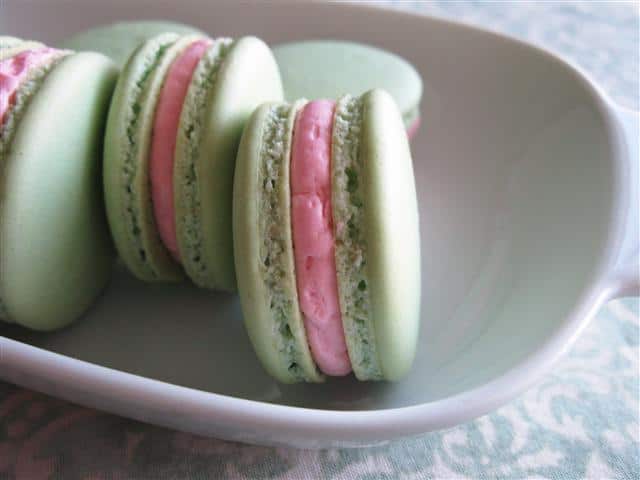
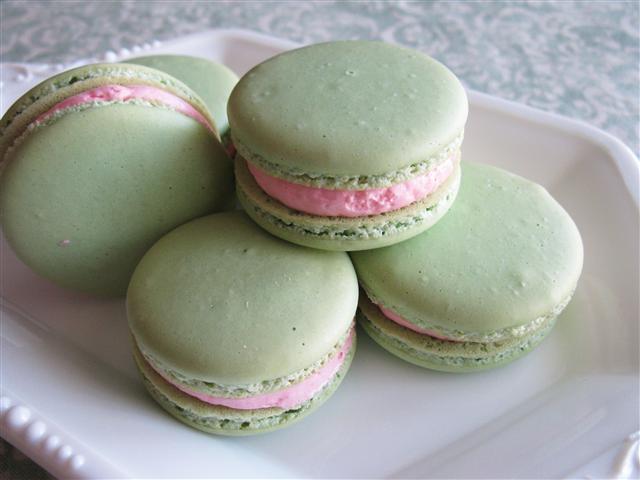
[h=2]Eid Mubarak & My Macaron Story[/h] Eid Mubarak! I want to wish everyone a very happy Eid al-Adha! You might remember that for Eid al-Fitr (which is the Eid celebration at the end of Ramadan) I made Syrian Ice Cream, which was flavored with lovely things like pistachio and rose. As a play on those lovely flavors I wanted to remake them into another dessert, Pistachio Macarons with Rose Buttercream. I chose macarons because they’re special and very celebratory, and besides, with all my failed attempts and macaron-making woes, I thought it was high time I mastered the recipe. Without further ado, I give you my macaron story.
* * *
I’ve gone and mentioned the unmentionable. Made the unmakeable (at least for me!). Macarons, those little fear and lust-inciting bites of heaven are indeed the topic I’m tackling today. Since they’re no longer my nemesis, I feel like I can speak freely of them. Share my knowledge on the topic, in hopes of helping someone out there who, like myself, had been beaten by them on several occasions prior. You see, the first time I made them (which was just over a year ago) I tried grinding my own almond meal. It turned into nut butter and I (ever the optimist) still continued onward with the recipe. As you can probably guess, it wasn’t pretty. The second time I made them (which was during the summer) was on a hot and humid day but I thought that since I was making them in a climate-controlled environment the weather wouldn’t be an issue. Turns out, it was. The third time I made them I didn’t quite work the batter enough to achieve macronnage (what a taunting word that is!). I was getting closer though, at least they had feet! I continued on in this way a few more times, each time failing but learning something. (You might be wondering why I persisted in my macaron experimentation for over a year. Maybe the simultaneous best and worst thing about me (definitely my Achilles’ heel anyway) is that when I set my mind on mastering something there really isn’t any way I can be dissuaded. And I refused to let a cookie beat me, lol!) And now I present you with my masterpiece, which has produced consistently beautiful results on three separate occasions.
When I first started looking for a macaron recipe to make I was blown away by the sheer volume of recipes out there. I finally decided to start with Martha Stewart’s recipe for Parisian Macaroons (I figure she didn’t get to be the domestic goddess she is by having non-workable recipes, right?). Sadly, the recipe didn’t work for me. I ended up making so many alterations and tweaks throughout my experimentation process that my masterpiece no longer looks anything like Martha’s original recipe. The other thing that completely frustrated me when I was looking for a macaron recipe is the fact that most recipes only give ingredient amounts in grams, ounces, or cups, but never all three (when you’re playing around with a recipe, this is really helpful information to have)! This is why for my masterpiece I list amounts in grams, ounces, and cups. The trickiest thing about making macarons is that there are so many variables that affect the end result. Here are some tips I’ve discovered during my macaron project:
Weather: Don’t make macarons on a day that’s too hot or humid.
Baking Pan: Choose your baking pan carefully. Since I don’t have special insulated macaron pans, I like to use heavy-duty half sheet pans.
Almonds: Don’t try to grind your own almonds. I was ambitious enough to think that my food processor was capable of a fine grind…of course I ended up with almond butter before I had a grind that was fine enough.
Eggs: I don’t bother with old eggs or room temperature eggs or special eggs that have been laid from super chickens; instead, I use a pretty fool-proof method. I put the eggs in a small bowl and fill it with hot water from the faucet (about 105F). Once the eggs don’t feel hot or cold to the touch, they’re ready to use.
Macronnage: This crucial step is where macarons are truly made. The batter is finicky in that it needs to be worked enough so that the feet develop and there are no points on top, but not worked too much, which will result in the macarons being flat or cracked. It’s a fine line, my friends. Here is an easy way to see if the batter is ready: use a rubber spatula to lift and drop the batter onto itself; if the ribbon gradually disappears into the batter within 30 seconds, it’s ready to go. If this step is done correctly, you will not end up with points on top of the macarons; by the time you’re done piping the first row, the points will have disappeared. (In the past, I’ve used a damp finger to push the points down; granted, this does get rid of the points, however it doesn’t fix the underlying problem, which is that the batter wasn’t worked long enough).
Piping: Start off by fitting a pastry bag with a round 1/2 inch tip. Put the bag in a tall glass and pour the batter in. You’re ready to pipe. Hold the bag straight above the tray (this gives you the most control of how fast the batter comes out) and gently apply pressure to squeeze out 1-inch circles. Speaking from experience, you will get much better at this with practice.
The Shell: Let the macarons sit at room temperature before baking until they form a shell that’s dry to the touch. How long this takes depends on the temperature, humidity level, and how fickle the macaron batter is feeling that day. In general, this can take anywhere from 30 minutes to 2 hours or more.
Baking Time: Determining when macarons are done baking can be somewhat tricky, as baking time can vary based on several factors, including your oven, the weather, how big you piped your macs, etc. At the oven temperature I use (300F), baking time ranges from about 10 to 20 minutes. The best thing you can do is to start checking them for doneness around 10 minutes, and keep a close eye on them after that. Macarons are done baking when the feet are formed, the top feels firm (but is not browned), and the insides are set. When they’re cooked all the way, they should easily come off parchment paper or a silicone baking sheet once they’re cooled (you can just peel them off or use a thin metal spatula), and the bottoms of the cookies should be flat.
Aging: Like most things, macarons get better over time (in this case, after a little aging in the fridge). (Aging not only helps the flavors develop and mesh, but if you happened to overbake your macs a teensy bit, the moisture from the filling will soak into the cookies, helping you end up with perfectly chewy macs.) Aging them is easy: line an airtight lidded container with parchment paper, carefully arrange the macarons inside, and let them sit in the fridge for a day or two (or up to a couple weeks) before eating. Let the cookies sit at room temperature for about 45 minutes before serving.
The last resource I want to offer you before I leave you with my recipe is an article that I found extremely helpful in my quest for the perfect macaron, called Macarons: Tips, Tricks and How to Macaronnageby Bake it Off.
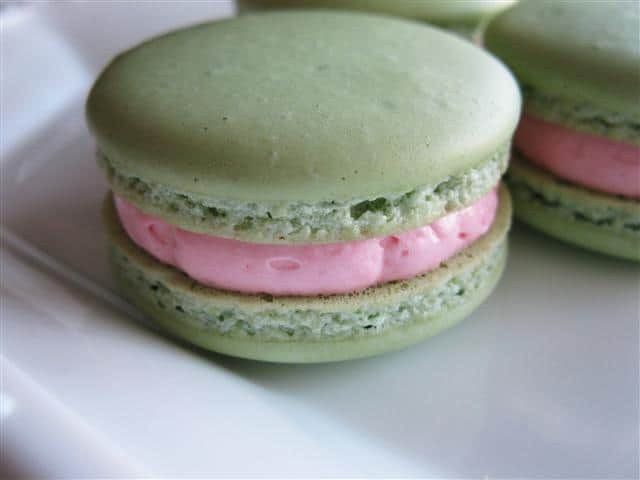
Happy Macaron-Making, Everyone! Pistachio Macarons with Rose Buttercream
(Yield: About 20 filled macarons) Macarons:
2 1/2 oz (70.9 gm or about 2 large) egg whites (ounces measured by weight, not volume)
4 oz (113.4 gm or 1 cup) powdered sugar (also called confectioner’s, icing, or 10X sugar)
2 oz (56.7 gm or 1/2 cup) almond meal/flour*
Pinch fine salt
1/4 teaspoon pure pistachio extract (use almond extract if you can’t find this)
About 5 drops liquid green food color
1 1/2 oz (42.5 gm or 3 tablespoons) superfine (castor) sugar Equipment (for macarons):
Handheld electric mixer
Rubber spatula
Piping bag fitted with 1/2-inch round tip
Baking pans
Parchment paper or silpat liners Buttercream:
1 large egg white
2 3/4 oz (77.962 gm or 1/3 cup) sugar
Pinch salt
1 stick (8 tablespoons) unsalted butter, at room temperature
1 teaspoon rose water
3-5 drops liquid red food color Equipment (for buttercream):
Double boiler
Whisk
Stand mixer Instructions for Macarons:
Step 1: Line 2 half sheet pans with parchment paper or silpat liners.
Step 2: Fill a bowl with hot water from the faucet (it should be about 105F); put the eggs in the water and let them sit until they come to room temperature. (Check them and turn them over every few minutes so they can come up to temperature on both sides. They’re ready when they don’t feel hot or cold to the touch. You may need to add more hot water if they’re not warming up fast enough.) Once the eggs are the right temperature, remove them from the water and dry them off. Separate the yolks from the whites, measuring 2 1/2 oz egg whites for this recipe (you don’t need the yolks for this recipe).
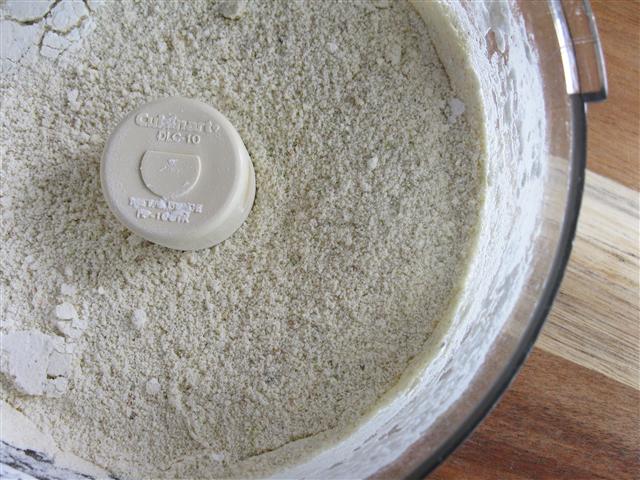
Step 3: In a medium bowl, whisk or sift together the powdered sugar, almond meal, and salt (or you can pulse it together a few times in a food processor).
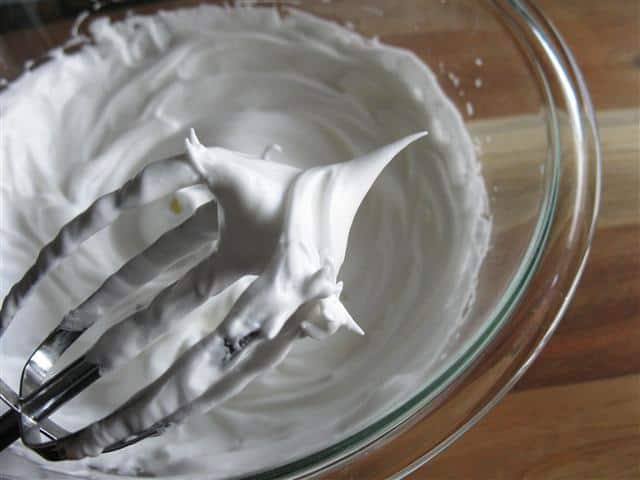
Step 4: Put the egg whites in a medium bowl and use a handheld electric mixer to whip. When the egg whites are foamy (this should only take a few seconds), gradually add the superfine sugar while still beating. When you have stiff, glossy peaks, beat in the pistachio extract and green food color.
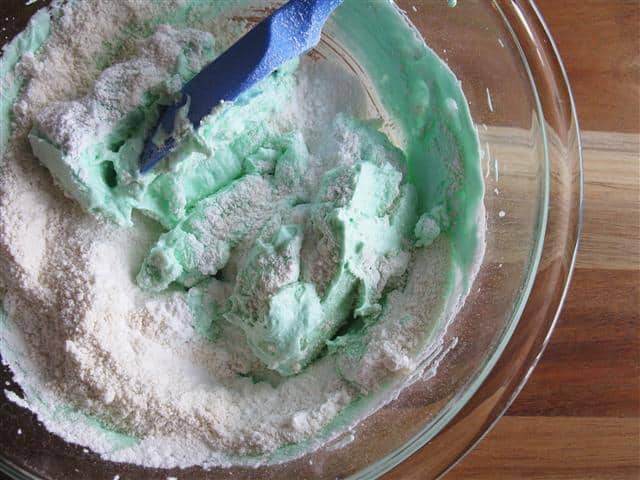
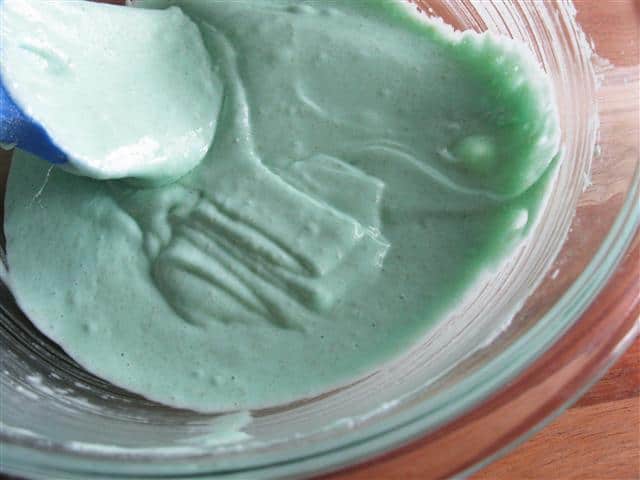
Step 5: Use a rubber spatula to gently fold the almond meal mixture into the egg whites. Only fold the batter in one direction by sliding the spatula into the center of the batter, then lifting it up and letting the batter fall back onto itself. It generally takes about 50 strokes to work the batter, but this number isn’t as important as how the batter looks. The batter is ready to pipe when it has a smooth, shiny surface and flows like lava in one large ribbon off the spatula. Here is an easy way to see if the batter is ready: use a rubber spatula to lift and drop the batter onto itself; if the ribbon gradually disappears into the batter within 30 seconds, it’s ready to go.
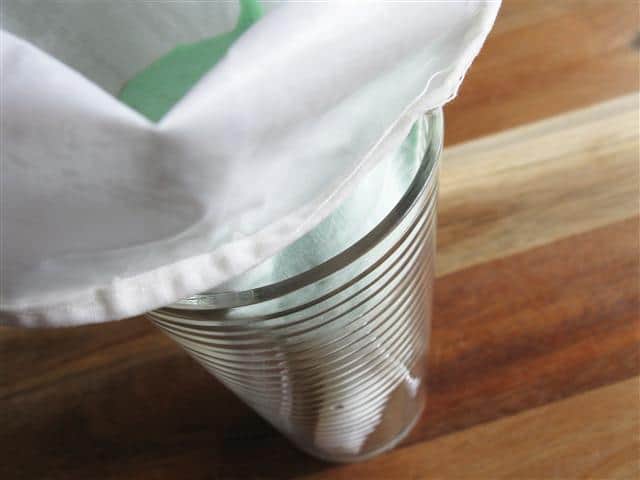
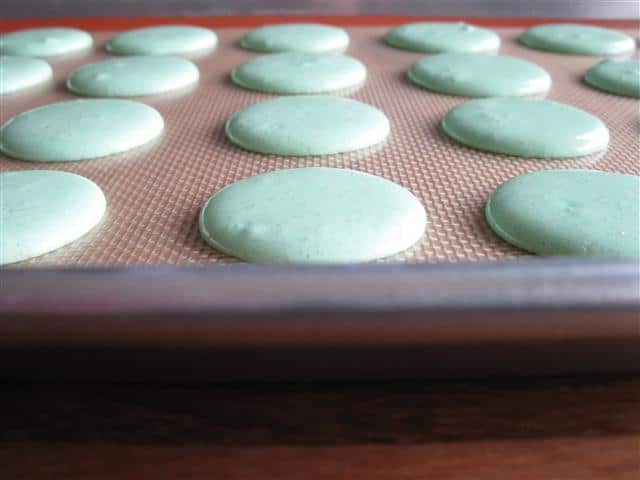
Step 6: Pour the batter into a pastry bag fitted with a round tip (1/2 inch in diameter); hold the piping bag straight (i.e., at a 90 degree angle) above baking sheet and pipe 1-inch circles onto the prepared sheet. (You should get about 40 macarons.) Leave about 1 inch between each macaron. Tap each tray a couple times on the countertop to help flatten out the macarons and get rid of any air bubbles. The macarons should not have points on top.
Step 7: Let the macarons sit at room temperature until they form a shell that’s dry to the touch (this could take anywhere from 30 minutes to 2 hours or more, depending on the weather).
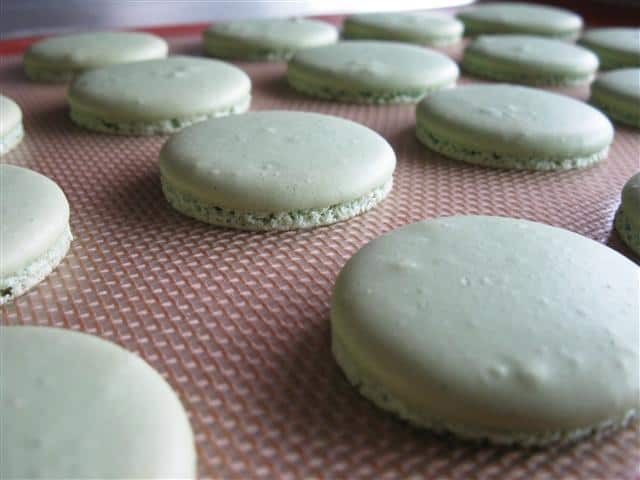
Step 8: Once the macarons are dry to the touch, preheat oven to 300F; once up to temperature, bake both trays at the same time for 10 to 20 minutes, rotating trays once. Let the macarons cool completely on parchment paper or silpat liner before removing.
Step 9: To fill the macarons, pair up similar sized cookies. Pipe filling onto the bottom of one macaron, then place the matching macaron on top of filling.
Step 10: Line an airtight lidded container with parchment paper and carefully arrange the macarons inside; let them sit in the fridge for a day or 2 (or up to a couple weeks) before eating. Let the cookies sit at room temperature for about 45 minutes before serving. Instructions for Buttercream: In a double boiler, whisk together the egg whites and sugar. Heat until the sugar is dissolved and the mixture is warm (about 140F), about 3 to 5 minutes, whisking frequently. Transfer the egg white/sugar mixture to the bowl of a stand mixer fitted with the whisk attachment. Add the salt and beat on high speed until the mixture is thick and glossy, about 5 to 7 minutes. Gradually add the butter piece by piece while beating, then beat in the rose water and red food color; stop beating when the buttercream is thick and smooth.
*For this recipe I used almond meal because I couldn’t find pistachio meal (and I’ve learned from past mistakes not to try to grind my own nut meal/flour at home ). If you have access to pistachio meal/flour and would like to try it in this recipe, let me know how it turns out!
Flowing Like Lava in One Large Ribbon off the Spatula
Here is an easy way to see if the batter is ready: use a rubber spatula to lift and drop the batter onto itself; if the ribbon gradually disappears into the batter within 30 seconds, it’s ready to go.
[h=2]Eid Mubarak & My Macaron Story[/h] Eid Mubarak! I want to wish everyone a very happy Eid al-Adha! You might remember that for Eid al-Fitr (which is the Eid celebration at the end of Ramadan) I made Syrian Ice Cream, which was flavored with lovely things like pistachio and rose. As a play on those lovely flavors I wanted to remake them into another dessert, Pistachio Macarons with Rose Buttercream. I chose macarons because they’re special and very celebratory, and besides, with all my failed attempts and macaron-making woes, I thought it was high time I mastered the recipe. Without further ado, I give you my macaron story.
* * *
I’ve gone and mentioned the unmentionable. Made the unmakeable (at least for me!). Macarons, those little fear and lust-inciting bites of heaven are indeed the topic I’m tackling today. Since they’re no longer my nemesis, I feel like I can speak freely of them. Share my knowledge on the topic, in hopes of helping someone out there who, like myself, had been beaten by them on several occasions prior. You see, the first time I made them (which was just over a year ago) I tried grinding my own almond meal. It turned into nut butter and I (ever the optimist) still continued onward with the recipe. As you can probably guess, it wasn’t pretty. The second time I made them (which was during the summer) was on a hot and humid day but I thought that since I was making them in a climate-controlled environment the weather wouldn’t be an issue. Turns out, it was. The third time I made them I didn’t quite work the batter enough to achieve macronnage (what a taunting word that is!). I was getting closer though, at least they had feet! I continued on in this way a few more times, each time failing but learning something. (You might be wondering why I persisted in my macaron experimentation for over a year. Maybe the simultaneous best and worst thing about me (definitely my Achilles’ heel anyway) is that when I set my mind on mastering something there really isn’t any way I can be dissuaded. And I refused to let a cookie beat me, lol!) And now I present you with my masterpiece, which has produced consistently beautiful results on three separate occasions.
When I first started looking for a macaron recipe to make I was blown away by the sheer volume of recipes out there. I finally decided to start with Martha Stewart’s recipe for Parisian Macaroons (I figure she didn’t get to be the domestic goddess she is by having non-workable recipes, right?). Sadly, the recipe didn’t work for me. I ended up making so many alterations and tweaks throughout my experimentation process that my masterpiece no longer looks anything like Martha’s original recipe. The other thing that completely frustrated me when I was looking for a macaron recipe is the fact that most recipes only give ingredient amounts in grams, ounces, or cups, but never all three (when you’re playing around with a recipe, this is really helpful information to have)! This is why for my masterpiece I list amounts in grams, ounces, and cups. The trickiest thing about making macarons is that there are so many variables that affect the end result. Here are some tips I’ve discovered during my macaron project:
Weather: Don’t make macarons on a day that’s too hot or humid.
Baking Pan: Choose your baking pan carefully. Since I don’t have special insulated macaron pans, I like to use heavy-duty half sheet pans.
Almonds: Don’t try to grind your own almonds. I was ambitious enough to think that my food processor was capable of a fine grind…of course I ended up with almond butter before I had a grind that was fine enough.
Eggs: I don’t bother with old eggs or room temperature eggs or special eggs that have been laid from super chickens; instead, I use a pretty fool-proof method. I put the eggs in a small bowl and fill it with hot water from the faucet (about 105F). Once the eggs don’t feel hot or cold to the touch, they’re ready to use.
Macronnage: This crucial step is where macarons are truly made. The batter is finicky in that it needs to be worked enough so that the feet develop and there are no points on top, but not worked too much, which will result in the macarons being flat or cracked. It’s a fine line, my friends. Here is an easy way to see if the batter is ready: use a rubber spatula to lift and drop the batter onto itself; if the ribbon gradually disappears into the batter within 30 seconds, it’s ready to go. If this step is done correctly, you will not end up with points on top of the macarons; by the time you’re done piping the first row, the points will have disappeared. (In the past, I’ve used a damp finger to push the points down; granted, this does get rid of the points, however it doesn’t fix the underlying problem, which is that the batter wasn’t worked long enough).
Piping: Start off by fitting a pastry bag with a round 1/2 inch tip. Put the bag in a tall glass and pour the batter in. You’re ready to pipe. Hold the bag straight above the tray (this gives you the most control of how fast the batter comes out) and gently apply pressure to squeeze out 1-inch circles. Speaking from experience, you will get much better at this with practice.
The Shell: Let the macarons sit at room temperature before baking until they form a shell that’s dry to the touch. How long this takes depends on the temperature, humidity level, and how fickle the macaron batter is feeling that day. In general, this can take anywhere from 30 minutes to 2 hours or more.
Baking Time: Determining when macarons are done baking can be somewhat tricky, as baking time can vary based on several factors, including your oven, the weather, how big you piped your macs, etc. At the oven temperature I use (300F), baking time ranges from about 10 to 20 minutes. The best thing you can do is to start checking them for doneness around 10 minutes, and keep a close eye on them after that. Macarons are done baking when the feet are formed, the top feels firm (but is not browned), and the insides are set. When they’re cooked all the way, they should easily come off parchment paper or a silicone baking sheet once they’re cooled (you can just peel them off or use a thin metal spatula), and the bottoms of the cookies should be flat.
Aging: Like most things, macarons get better over time (in this case, after a little aging in the fridge). (Aging not only helps the flavors develop and mesh, but if you happened to overbake your macs a teensy bit, the moisture from the filling will soak into the cookies, helping you end up with perfectly chewy macs.) Aging them is easy: line an airtight lidded container with parchment paper, carefully arrange the macarons inside, and let them sit in the fridge for a day or two (or up to a couple weeks) before eating. Let the cookies sit at room temperature for about 45 minutes before serving.
The last resource I want to offer you before I leave you with my recipe is an article that I found extremely helpful in my quest for the perfect macaron, called Macarons: Tips, Tricks and How to Macaronnageby Bake it Off.
Happy Macaron-Making, Everyone! Pistachio Macarons with Rose Buttercream
(Yield: About 20 filled macarons) Macarons:
2 1/2 oz (70.9 gm or about 2 large) egg whites (ounces measured by weight, not volume)
4 oz (113.4 gm or 1 cup) powdered sugar (also called confectioner’s, icing, or 10X sugar)
2 oz (56.7 gm or 1/2 cup) almond meal/flour*
Pinch fine salt
1/4 teaspoon pure pistachio extract (use almond extract if you can’t find this)
About 5 drops liquid green food color
1 1/2 oz (42.5 gm or 3 tablespoons) superfine (castor) sugar Equipment (for macarons):
Handheld electric mixer
Rubber spatula
Piping bag fitted with 1/2-inch round tip
Baking pans
Parchment paper or silpat liners Buttercream:
1 large egg white
2 3/4 oz (77.962 gm or 1/3 cup) sugar
Pinch salt
1 stick (8 tablespoons) unsalted butter, at room temperature
1 teaspoon rose water
3-5 drops liquid red food color Equipment (for buttercream):
Double boiler
Whisk
Stand mixer Instructions for Macarons:
Step 1: Line 2 half sheet pans with parchment paper or silpat liners.
Step 2: Fill a bowl with hot water from the faucet (it should be about 105F); put the eggs in the water and let them sit until they come to room temperature. (Check them and turn them over every few minutes so they can come up to temperature on both sides. They’re ready when they don’t feel hot or cold to the touch. You may need to add more hot water if they’re not warming up fast enough.) Once the eggs are the right temperature, remove them from the water and dry them off. Separate the yolks from the whites, measuring 2 1/2 oz egg whites for this recipe (you don’t need the yolks for this recipe).
Step 3: In a medium bowl, whisk or sift together the powdered sugar, almond meal, and salt (or you can pulse it together a few times in a food processor).
Step 4: Put the egg whites in a medium bowl and use a handheld electric mixer to whip. When the egg whites are foamy (this should only take a few seconds), gradually add the superfine sugar while still beating. When you have stiff, glossy peaks, beat in the pistachio extract and green food color.
Step 5: Use a rubber spatula to gently fold the almond meal mixture into the egg whites. Only fold the batter in one direction by sliding the spatula into the center of the batter, then lifting it up and letting the batter fall back onto itself. It generally takes about 50 strokes to work the batter, but this number isn’t as important as how the batter looks. The batter is ready to pipe when it has a smooth, shiny surface and flows like lava in one large ribbon off the spatula. Here is an easy way to see if the batter is ready: use a rubber spatula to lift and drop the batter onto itself; if the ribbon gradually disappears into the batter within 30 seconds, it’s ready to go.
Step 6: Pour the batter into a pastry bag fitted with a round tip (1/2 inch in diameter); hold the piping bag straight (i.e., at a 90 degree angle) above baking sheet and pipe 1-inch circles onto the prepared sheet. (You should get about 40 macarons.) Leave about 1 inch between each macaron. Tap each tray a couple times on the countertop to help flatten out the macarons and get rid of any air bubbles. The macarons should not have points on top.
Step 7: Let the macarons sit at room temperature until they form a shell that’s dry to the touch (this could take anywhere from 30 minutes to 2 hours or more, depending on the weather).
Step 8: Once the macarons are dry to the touch, preheat oven to 300F; once up to temperature, bake both trays at the same time for 10 to 20 minutes, rotating trays once. Let the macarons cool completely on parchment paper or silpat liner before removing.
Step 9: To fill the macarons, pair up similar sized cookies. Pipe filling onto the bottom of one macaron, then place the matching macaron on top of filling.
Step 10: Line an airtight lidded container with parchment paper and carefully arrange the macarons inside; let them sit in the fridge for a day or 2 (or up to a couple weeks) before eating. Let the cookies sit at room temperature for about 45 minutes before serving. Instructions for Buttercream: In a double boiler, whisk together the egg whites and sugar. Heat until the sugar is dissolved and the mixture is warm (about 140F), about 3 to 5 minutes, whisking frequently. Transfer the egg white/sugar mixture to the bowl of a stand mixer fitted with the whisk attachment. Add the salt and beat on high speed until the mixture is thick and glossy, about 5 to 7 minutes. Gradually add the butter piece by piece while beating, then beat in the rose water and red food color; stop beating when the buttercream is thick and smooth.
*For this recipe I used almond meal because I couldn’t find pistachio meal (and I’ve learned from past mistakes not to try to grind my own nut meal/flour at home ). If you have access to pistachio meal/flour and would like to try it in this recipe, let me know how it turns out!
Flowing Like Lava in One Large Ribbon off the Spatula
Here is an easy way to see if the batter is ready: use a rubber spatula to lift and drop the batter onto itself; if the ribbon gradually disappears into the batter within 30 seconds, it’s ready to go.


")