IB Kitchen Club

well i don't know exactly but i can try telling what my mom did last time recalling my memory...:p its very easy..

Ingredients

seedless dates
biscuits ( we use marry biscuits)
butter
coconut powder

Direction

*fry the dates in butter at low heat, continuously stir it with spoon until its soften, this will some take time, be careful it is not stuck in pan
*crush the biscuits finely and add it to the date mixture with coconut powder.
*move it out of the heat, you can add honey or sugar to sweeten the mixture (but we don't add them )
*make balls just same as above and roll them in coconut powder..
 
Mediterranean Broccoli Almond Soup

feature-quick-tips-broccoli-soup.png


Ingredients:

1 tablespoon olive oil
1 clove garlic, minced
1 shallot, minced
1 medium potato, diced
2 large bunches of broccoli, cut into florets and stems sliced thin (about 8 cups)
4 cups chicken or vegetable broth
1/2 cup ground, toasted almonds
Sour cream for garnish (optional)

Directions:
1.Heat olive oil over medium heat. Add garlic and shallot and sauté until fragrant, about 30 seconds.
2.Add potato and sauté, stirring constantly until softened slightly, about 2 minutes.
3.Add broccoli and broth to pan. Cover, bring to a boil, and cook for about 5 minutes or until broccoli florets, stalks and potato are tender.
4.Allow the mixture to cool slightly, then transfer to a blender or food processor and puree until smooth. You may need to do this in batches. Take care - mixture will be very hot!
5.Add ground almonds and pulse a few more times until fully incorporated.
6.Return mixture to pan and reheat.
7.Serve, garnishing with a dollop of sour cream if desired.
 
Honey Lemon Chicken

HoneyLemonChicken500-1.jpg


Ingredients:
1 pound chicken breasts
salt and pepper
1 tablespoon oil
1 tablespoon ginger (grated)
1 lemon (juice and zest)
2 tablespoons honey
1/4 cup chicken stock
salt and pepper to taste

Directions:
1. Season the chicken with salt and pepper.
2. Heat the oil in a pan.
3. Add the chicken and saute until golden brown and cooked through and set aside.
4. Add the ginger and saute until fragrant, about a minute.
5. Add the lemon juice and zest, honey, stock, salt and pepper and reduce to thicken. (Note: Do a taste test here to make sure that the lemon and honey balance nicely.)
6. Pour the honey lemon sauce over the chicken.
 
Italian Lemon Ice

Popular in Sicily and with a rougher texture than sorbetto, the Italian ice called granita is an easy-to-fix palate cleanser or finish for any summer meal. You don't need special equipment or skills to make this lemony sweet. Just a fork and a freezer.

pic5HDdqE-1.jpg


6 to 8 servings

Ingredients

•Water -- 3 cups
•Sugar -- 1 1/2 cups
•Fresh lemon juice -- 1 cup

Method
1.Bring 1 cup of the water and the sugar to a boil in a saucepan, stirring to dissolve the sugar. Continue boiling for 8 to 10 minutes. Remove from heat and let to cool.

2.Stir in the remaining water and lemon juice. Pour the mixture into a glass baking dish and set in the freezer for on or tow hours until it starts to get slushy.

3.Stir well with a fork, breaking up any large chunks of ice or ice crystals. Repeat this process every 20 minutes or so until the granita is frozen solid.

4.Place scoops in small glasses or dessert bowls and serve.


Variations
Let your imagination run free. There are so many options. Here are a few of the more common variations:

•Granita alla Arancia (Orange Granita): 1/4 cup water; 1/2 cup sugar; 2 tablespoons lemon juice; 3 cups of orange juice. Boil the water and sugar only long enough to dissolve the sugar. Stir in the orange lemon juice. Freeze as for lemon granita.

•Granita al Caffè (Coffee Granita): Use 4 cups of strong black coffee or espresso and 1 cup sugar. Boil 1 cup of the coffee with the sugar only long enough to dissolve the sugar, then stir in the remaining coffee. Freeze as for lemon granita. Top with whipped cream.

•Granita di Fragole (Strawberry Granita): 1 cup of water; 3/4 cup sugar; 1 pound strawberries, hulled and pureed; 2 tablespoons lemon juice. Boil the water and sugar as for the lemon granita. Stir in the strawberry puree and lemon juice. Freeze as for lemon granita.
 
^^ I am planning to make it next time using watermelon juice. Let´s see how it works...
 
oh no im so sorry u guys i had to post the molten lava cake recipe i'll post it as soon as i type it i totally forgot.
 
nah sis lol just not well these days havnt forgotten u guys i do peek in sometimes.
 
Palestinian eggplant baked with tomatoes and chickpeas

Musaqa'a is similar to French ratatouille. Though the pronunciation is the same, and both contain eggplant, this vegetarian dish is not the same as Greek moussaka. Also spelled musakka'a or musaqaa.

4 to 6 servings


Ingredients
•Eggplant, cubed -- 1 large
•Olive oil -- 3 tablespoons
•Salt and pepper -- to season
•Olive oil -- 1/4 cup
•Onion, chopped -- 1
•Tomatoes, peeled, seeded and chopped -- 3
•Chickpeas, cooked and rinsed -- 2 cups
•Water or tomato juice -- 1 cup
•Salt and pepper -- to season


Method
1.Preheat oven to 400°F. In a large bowl, toss the eggplant together with 3 tablespoons of olive oil, salt and pepper. Spread in a single layer in a roasting pan and roast in the oven for 15 to 20 minutes, or until lightly browned and softened.
2.While the eggplant is roasting, heat the 1/4 cup olive oil in a large skillet over medium heat. Add the onions and sauté until translucent. Add the tomatoes, chickpeas, water or tomato juice, salt and pepper. Bring to a boil and stir to heat through, 3 to 4 minutes. Adjust seasoning to taste.
3.Place the eggplant in a casserole dish and pour the tomato-onion mixture over it. Place in the oven and bake for 40-45 minutes, or until bubbling through. Remove and serve hot or at room temperature.


Variations
•The eggplant can be cut in 1/2-inch rounds and sautéed in hot oil instead of roasting it if you like.
•The chickpeas can be eliminated.
•Add some chopped parsley and/or 1 teaspoon of ground allspice to the tomato-onion mixture if you like.
 
Chocolate and peppermint swirl cookies with basic cookie dough

Ingredients
2 and 3/4 cups all-purpose flour
1/4 teaspoon baking soda
1/4 teaspoon salt
1 cup (2 sticks) butter (no substitutions), softened
3/4 cup granulated sugar
1 large egg
1 teaspoons vanilla extract

1/4 teaspoon almond extract.

For the chocolate half

2 tablespoons coco

For the peppermint half
1 -2 teaspoons green food coloring
1/4 teaspoon peppermint extract

Directions

•In a bowl combine flour, baking soda, and salt.

•In the food process beat butter and sugar 1 minute or until creamy, occasionally scraping bowl with rubber spatula.

• Add egg and vanilla; beat until well mixed. Reduce speed to low; gradually beat in flour mixture just until blended, occasionally scraping down the sides.

•Divide the dough in half adding the coco to one half (if you find the dough too dry add a tablespoon of milk). Add the green dye and peppermint extract to the other.

•Refrigerate for 15 minutes.

•Roll the chocolate dough into a rectangle on wax paper, do the same with the peppermint dough and try to make the two rectangles of similar size

greenandbrown-1.jpg


•Using the was paper place on rectangle on top of the other, peel off the wax paper and trim the sides

layers-1.jpg


•Using the wax paper to help, roll the dough rectangle starting with the long side

roll-1.jpg


•refrigerate for 15 minutes

•Cut 1 cm slices and arrange them on a baking sheet

•Bake on the lowest rack of a 180 C (375 F) oven for 5-8 minutes (you want the bottoms to become slightly golden but no more than that or you will lose the demarcation between the two colors)

bakedcookies-1.jpg


•Place under the broiler until the tops are slightly golden

•Allow to cool on the baking sheet for 5 minutes then transfer to a cooling wire rack

peppermintcookiesclosejpgw535h535-1.jpg
 
Watermelon rind jam

watermelonjamjpgw600h754-1.jpg


3 cups watermelon rind
1.5 cups sugar
Zest of one orange (the colored part only not the white)
juice of half a lemon
1 cinnamon stick

Remove the green parts off the rind and then cut the rind into 1-2 cm cubes.

weightjpgw600h649-1.jpg


Add enough boiling water to submerge the rind cubes then leave it to cool down and store it in the fridge over night

the next day drain the watermelon reserving 2 cups water and then add the watermelon and water to a pot and bring it to a boil over medium heat.

When the water boils lower the heat and allow it to simmer for 10 minutes.

Add the sugar (you need to add half the amount of watermelon in sugar, the ratio is 2:1 watermelon rind to sugar) and stir till the sugar dissolves

Then add the cinnamon and orange peel and lower the heat .

cinnamonjpgw600h526-1.jpg


Stir the mix occasionally for an hour over very low heat keeping the pot partially covered. (you may need to add water if you feel the fluid is drying up before the watermelon rind is cooked through, you’ll know it is cooked through when it turns translucent )

Gradually the liquid will thicken and deepen in color, if you like the watermelon rind to be of candied fruit consistency leave it till it is deep amber color and most of the liquid has been absorbed

If you like it to more closer to the consistency of a loose jam take it off the heat when the color is golden.

One thing you should remember, the color and consistency of the jam will continue to deepen and thicken after you take it off the heat as it cools down.

Notes:

If you do not go through enough watermelon to produce 3 cups of rind you can peel and cut the rind and submerge it in water and store it in the fridge, add to it until you have the entire amount you need to make the jam

Serving suggestions:

The jam is eaten with bread , toast ,with some heavy or double cream or with some butter. You can also top desserts with it. There is also the option of cutting it with a cookie cutter instead of cutting the rind into squares and cooking it the same way and then draining off the liquid and allowing it to drain over night on a wire rack and serving as candy
 
Chocolate and peppermint swirl cookies with basic cookie dough

Ingredients
2 and 3/4 cups all-purpose flour
1/4 teaspoon baking soda
1/4 teaspoon salt
1 cup (2 sticks) butter (no substitutions), softened
3/4 cup granulated sugar
1 large egg
1 teaspoons vanilla extract

1/4 teaspoon almond extract.

For the chocolate half

2 tablespoons coco

For the peppermint half
1 -2 teaspoons green food coloring
1/4 teaspoon peppermint extract

Directions

•In a bowl combine flour, baking soda, and salt.

•In the food process beat butter and sugar 1 minute or until creamy, occasionally scraping bowl with rubber spatula.

• Add egg and vanilla; beat until well mixed. Reduce speed to low; gradually beat in flour mixture just until blended, occasionally scraping down the sides.

•Divide the dough in half adding the coco to one half (if you find the dough too dry add a tablespoon of milk). Add the green dye and peppermint extract to the other.

•Refrigerate for 15 minutes.

•Roll the chocolate dough into a rectangle on wax paper, do the same with the peppermint dough and try to make the two rectangles of similar size

greenandbrown-1.jpg


•Using the was paper place on rectangle on top of the other, peel off the wax paper and trim the sides

layers-1.jpg


•Using the wax paper to help, roll the dough rectangle starting with the long side

roll-1.jpg


•refrigerate for 15 minutes

•Cut 1 cm slices and arrange them on a baking sheet

•Bake on the lowest rack of a 180 C (375 F) oven for 5-8 minutes (you want the bottoms to become slightly golden but no more than that or you will lose the demarcation between the two colors)

bakedcookies-1.jpg


•Place under the broiler until the tops are slightly golden

•Allow to cool on the baking sheet for 5 minutes then transfer to a cooling wire rack

peppermintcookiesclosejpgw535h535-1.jpg

Yummy :)
 
Orange jam

The recipe is really simple yet the end result is enough to make you swear never to buy orange jam again. ;)

1 kg orange segments

750 grams to 1 kg (4-5 cups ) sugar

1 cup orange juice

Juice of 1 lemon

1 cup of thinly slices orange peel (optional)

Instructions

If you want to add the peel to the jam peel the oranges as thinly as possible, try to get the colored part only.

Remove the white part of the peel, discard.

Cut the oranges into 1 cm segments, add the sugar and let it stand for a couple of hours (this will draw out the juices of the orange segments)

Remove the seeds(they will float on top of the juice)

In a pot, add the orange segments, sugar, lemon juice and orange juice.

orangesegments-1.jpg


Bring to a boil over medium low heat stirring occasionally.

When the mixture comes to a boil reduce the heat to low and stir every few minutes to make sure it doesn’t stick to the bottom of the pot.

cook-1.jpg


Simmer over low heat until the mixture is reduced to 1/3 the original amount and the consistency is thick (this should take an hour to an hour and a half)

If you plan on adding the orange peel, after the mixture has reduced to 1/2 its original size (40-50 minutes into cooking) add the peel.

after-1.jpg


Allow the mixture to cool completely away from any sources of moisture. I cover the pot with a clean cloth while cooling, don’t use the lid of the pot, if you do the hot steam might condense into water drops and if water gets into the jam it goes bad.

Once the mixture has cooled, fill it into jars.

orangejamcloseupjpgw535h459-1.jpg


Notes:

You can double or half the recipe, the key is using equal amounts of orange and sugar.

Adding the orange peel will enhance the flavor of the jam and it will also act as a natural thickening agent.

Cook the jam to the point of having the consistency of a thick cake batter, remember it will thicken even more as it cools down.

The amount of sugar depends on the way you want to store the jam, if you want to keep it in the fridge use 750 grams of sugar. If you want to keep it outside the fridge use 1 kg sugar. I prefer using less sugar because that allows the fruit flavor to shine
 
Homemade labneh

top1jpgw600h400-1.jpg


Some call it yogurt cheese, others call it the Lebanese cream cheese but it is most commonly known as labneh. It is a staple on any breakfast menu, on dips, makes a wonderful sandwich with a few mint leaves or some pitted olives. To put it simply labneh is strained yogurt, it is super easy to make and very tasty and the best part is, you can flavor it any way you like. Mint, oregano, sumac, olives, chili flakes, your imagination is the limit, better yet why not try a combination of flavors and make a middle eastern dip that is all your own.

Compared to cream cheese, labneh is much healthier and lighter in calories, you can make it using regular yogurt or fat free yogurt but the best labneh is the one you make out of homemade yogurt. Another major plus to making labneh is that it is really easy to preserve, regular labneh lasts 2-3 weeks in the fridge. If you strain it further, you will get a labneh that you can roll into balls and these are called “labneh korat”or”labneh mka3baleh” which means “labneh balls”.


1 Kg Yogurt (greek, regular or fat free)

1 teaspoon salt

Place a piece of doubled cheesecloth or soft cotton fabric (preferably undyed and clean) in the colander and place the colander over a deep bowl

Stir the salt into the yoghurt then spoon the yoghurt in the center of a piece of the cheesecloth.

afterstrainingjpgw600h524-1.jpg


Leave to drain for 3-5 hours . (if the weather is hot allow it to drain in the fridge).

You can also pull the corners of the cheese cloth up and tie them tightly and then suspend from a stationary object over a bowl (to collect the whey) . Again if the weather is hot do this in the fridge.Let the labneh hang overnight,when well drained it will be the consistency of cottage cheese.

Remove from the cloth and store covered in the refrigerator until needed.

Notes

If your labneh is still too thin in consistency, you have two options to make it thicker

◾Fold the cheese cloth around the labneh and then place a weight over the labneh (think heavy bottle or a bag of rice or sugar, something 3-5 kg in weight). The weight will help draw out the whey.

◾Leave the labneh to strain the fridge, get a clean white fabric and wrap the labneh in it and place it in the fridge in a colander over a bowl to collect the whey. Change the fabric two times a day for 2-3 days and the labneh should become very thick as the fabric will draw the whey out of it

Flavors: You can mix in fresh or dried herbs, minced garlic, pepper flakes or any other flavoring you like.

Cheese cloth The purpose of “cheese cloth” is to separate the curds from the whey by allowing the whey to drain while holding the curds and preventing them from passing through. What most people think of as “cheese cloth:” the very wide weave material is often useless for this purpose unless you double it over itself 4 or 8 times . I recommend using either a large plain white cotton handkerchiefs, or white non-terry cotton dish towels, something clean that you dedicate for cheese making and make sure it is a fabric with fine weave

If you don’t have a cheese cloth try using unbleached coffee filters lining a fine sieve to strain the yogurt

To Serve Labneh:
◾Spread it evenly over a medium-sized plate. Sprinkle with fresh seasonal herbs like mint or dill – or place a few olives around the center of the plate. Drizzle a thread of olive oil over all. Serve with pita or other fresh bread

◾Use it as a spread to make a sandwich, plain or with some mint on top.

◾Serve it as a dip with cucumber, carrots or celery sticks
 
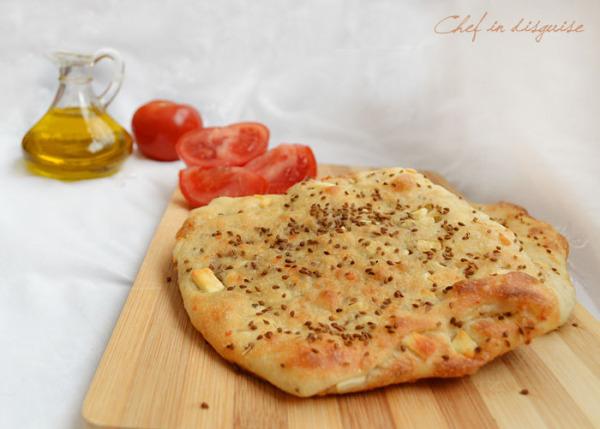
Cheese and anise bread

(feteer falahi bjebneh - Palestinian peasant pastry)

sidejpgw600h429-1.jpg


To make 8 squares

The dough
1 kg all purpose flour
1 tablespoon yeast
1 teaspoon sugar
1/4 teaspoon salt
water
1/2 cup olive oil
1/2 cup vegetable oil


I usually half the recipe to get 4 squares, you can double or half the recipe according to your needs

The filling
Cheese and anise filling
3 cups of nabulsi cheese (or any firm salty cheese that holds its shape during baking) cut into small 1 cm cubes
2 tablespoons anise

Instructions

Mix the filling ingredients in a bowl , set aside

In a 1/4 cup of warm water dissolve the yeast and sugar and wait for the yeast to bubble (this is called proofing the yeast, if the yeast does not bubble and foam, it has gone bad and you need to buy a new one)

Add the salt to the flour, whisk to combine, add the yeast/water mixture and start kneading adding water gradually till you get a soft sticky dough consistency (I needed 2 cups of water but the amount varies with the type of flour)

Knead the dough for 5-7 minutes, allow to rest , covered in a warm place for half an hour

In a bowl add the vegetable oil and olive oil and keep it next to your working area.

Wet your hands with a little oil and cut the dough into 8 balls , brush each ball in the oil mixture and allow to rest for another 10-15 minutes

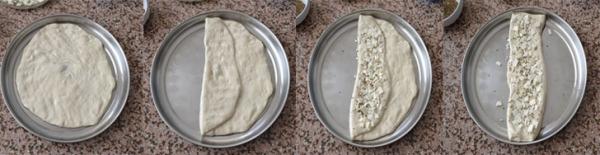
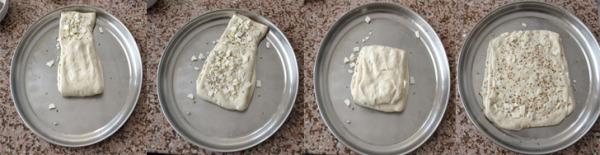
Brush a pan or your working surface with a little oil, start with the first dough ball you cut and spread it into a circle roughly 25 cm or 10 inches in diameter

stepsjpgw600h154-1.jpg


Brush the top with a little oil then fold one-third of the circle onto the middle third of it (as you can see in the picture)

Spread your filling onto the folded part of the dough then fold the other third over the filling (the dough should now look like a rectangle)

steps2jpgw600h154-1.jpg


Fold one-third of the rectangle over the middle third, cover it with your filling of choice.

Fold the other third over your filling (now you should have a square dough)

Allow this one to rest while you start working on the next one.

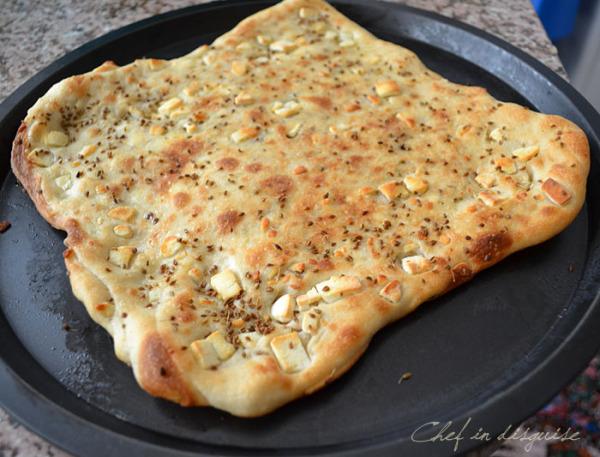
Once you have stuffed and folded all the dough balls, go back to the first square and brush it with oil and spread it into a larger square using a rolling-pin or your hands. Then do the same with the rest of your squares.

Note: The larger and thinner you spread the filled dough, the more crispy the final brad will be. If you would rather have a soft and chewy bread, don’t spread the filled dough squares too much

Transfer the dough to a baking sheet that you have brushed with oil and sprinkle them with anise.

Bake on the middle rack of a preheated oven (270 C or the highest temperature your oven will go)

Once the bottom is golden brown, turn on the broiler till the tops are golden brown too Don’t leave this bread unattended, it browns quickly because it is thin

bakedjpgw600h456-1.jpg


Allow the bread to cool on a wire rack for 7-10 minutes and then cover with a clean dry cloth to keep it from becoming dry.

Notes:
◾This bread can be frozen for up to 3 months, just wrap well in a plastic bag and freeze it.When you want to eat it just get it out of the freezer and into a heated oven for a few minutes till it is warmed through and it will be as good as new
◾You can make the bread in a smaller individual portion size by cutting the dough into smaller balls (16 balls instead of 8 if you are making the whole recipe)
◾Nabulsi cheese is a salty firm cheese made from goat’s milk, I will be sharing the recipe and the step by step procedure to making it in a post coming very soon. If you can’t find it, you can replace it with any firm and salty cheese you like
◾The filling can be adapted to your liking. Spinach and onions, oregano and green onions, or almonds are the traditional choices but you can try new and different combinations,use your imagination.
 

Similar Threads

Back
Top